This is the Very First step of Unleashing the full Android System, though the process is different for Every Mobile Phone ( Brands) like Xiaomi, OnePlus, Motorola, realme, fairphone, Google, samsung, etc. I’ll try to include as many Brands I can.
WARNING ⚠️
Unlocking the bootloader may void your warranty forever and it cannot be retained even if you relock bootloader (except for fairphone). To know more about the Risks involving unlocked bootloader and its pros and cons, CLICK HERE
Prerequisites:
Note: The prerequisites are Required for most devices but there are exceptions, you can totally skip this part of you have the following devices and head on directly to your device instructions.
- Xiaomi
- Fairphone
- You should have an Android phone with atleast 80% charge and a PC with Windows 7, 8 ,8.1,10 or 11
- Install the latest ADB and fastboot drivers from this here:
- ADB for Windows: Download
- ADB for Linux: Download
- ADB for Mac: Download
- To install Android Debug Bridge, Extract the downloaded file to C:/ and rename it to platform-tools
- To setup ADB, go to c:/platform-tools , press Shift+Right Click
- Click on (Open Powershell window here) for Windows 10
- Click on (Open Command Prompt here) for Windows 7 through 8.1
- Type the Command : adb version and hit Enter
- If the command works as expected, skip to step 11, if it shows this error: ‘adb’ is not recognized as an internal or external command, operable program or batch file, proceed to next step
- Type the following command to solve the error: setx PATH “%PATH%;C: \platform-tools”
- Now try using the adb version command , if it works, close the window and proceed further
- Now, to enable developer options, go to your device settings and find About Device>Build Number and tap 8 times on it, it may require password, enter it and proceed
- Once Developer Settings have been enabled, head to Settings>system>{ } Developer options and enable USB debugging and OEM unlocking, once this step is completed, plug in your device to the PC
Note : The OEM Unlocking option is not the same for every device, so if you don’t find it, proceed further to the next step, tough it’s a bit uncommon, and the build number could be different too, for eg: it’s MIUI version for Xiaomi Devices
- Now open Powershell/CMD in the platform-tools folder like previously and type: adb devices
- A message will prompt on your device, click on always allow
- If PC recognises your device, you have successfully set up your Android Debug Bridge
Moving further, we’ll see how to do the actual unlocking part for different devices
For Xiaomi Devices

- Go to settings>Mi account>Mi cloud>Enable sync and find device
- Login to Mi cloud server to check if your device is synced, also make sure you don’t login with this account on other Mi devices
- Download the latest Mi Flash Unlock tool from this link
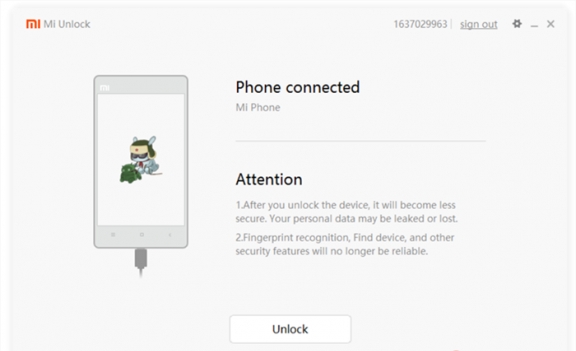
- Now run the MiFlashTool software and login with the same account you used with your phone
- Turn off you phone, hold the volume down + Power button until it reboots into fastboot mode
- Now connect your phone to PC and the MiFlashtool will show up as connected
- Now click on Unlock in the software
- Your phone will be unlocked now and you will be able to flash Custom ROMs, root, etc
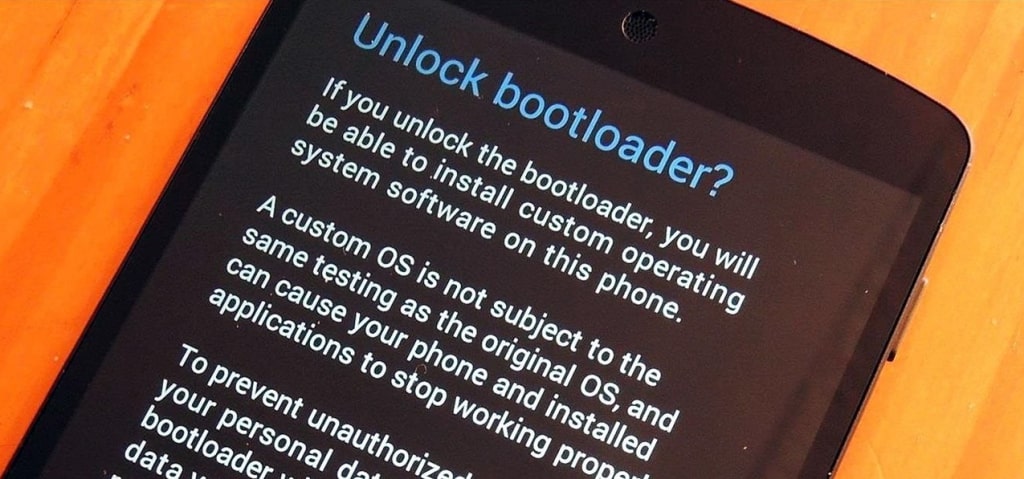
- To check the bootloader status, you will see an unlocked padlock symbol when you reboot your phone every time like in the below picture

For Motorola Devices
- I assume you’ve completed all the prerequisites prior to these steps
- Connect you device to PC and open ADB command window like you did in the previous setup
- Type command : adb devices
- If your device is recognised, type the next command: adb reboot bootloader
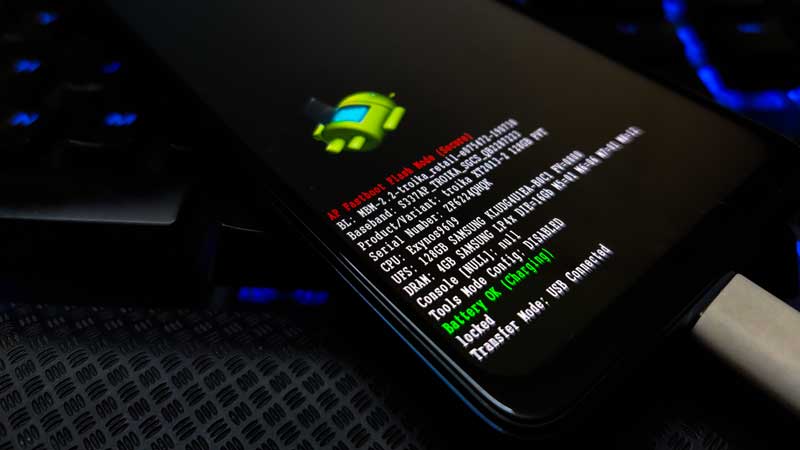
- Now that your device is in bootloader, type: fastboot oem get_unlock_data
- If it doesn’t work, first type: fastboot reboot fastboot and then fastboot oem get_unlock_data
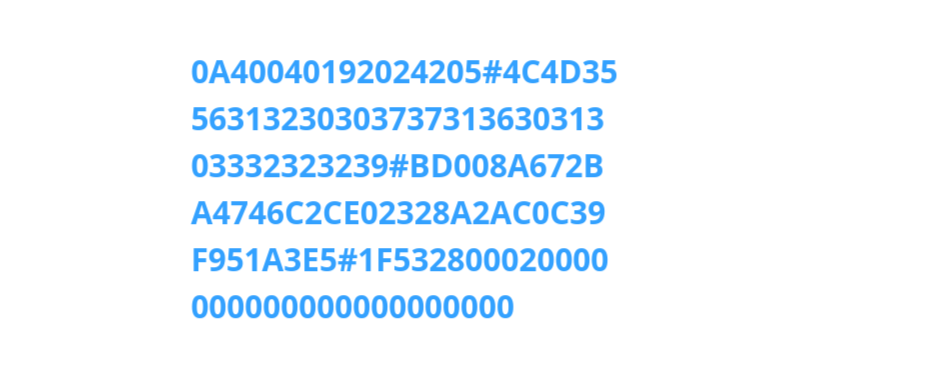
- Now you will recieve an output which looks like this:

- Now copy the output from (bootloader) to 0000000
- Paste it in a text editor and remove all the (bootloader) part, and all the spaces
- Your code should look like this:
- Now go to Motorola Bootloader Unlock Site
- Sign in using your Google account
- And paste the code on the site where it is asked
- Click Can my device be unlocked and you’ll get a Request unlock key button
- When you click it, you will recieve another code in your Gmail
- Go to adb abd type: fastboot oem unlock xxxxxxxx
- Replace the xxxxxxxx with the code you received in your Gmail
- A confirmation may pop up on your phone, click yes
- Congratulations, your phone is now unlocked
For OnePlus Devices

- To complete the prerequisites, you will have to download and install OnePlus USB drivers from here
- After that, open adb like previously and type: adb devices after connecting your phone
- If your device shows up, type: adb reboot bootloader
- You’ll see this:
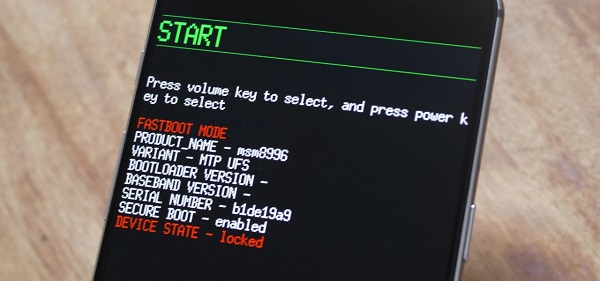
- Now type: fastboot devices to confirm that the PC recognises the device
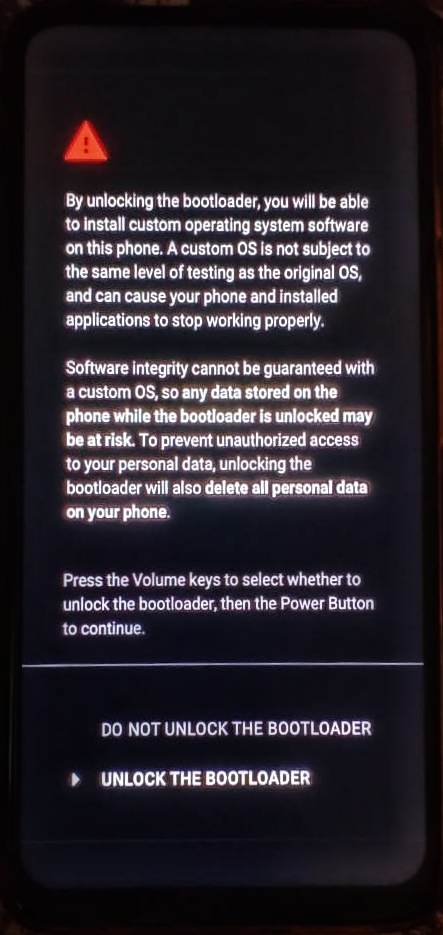
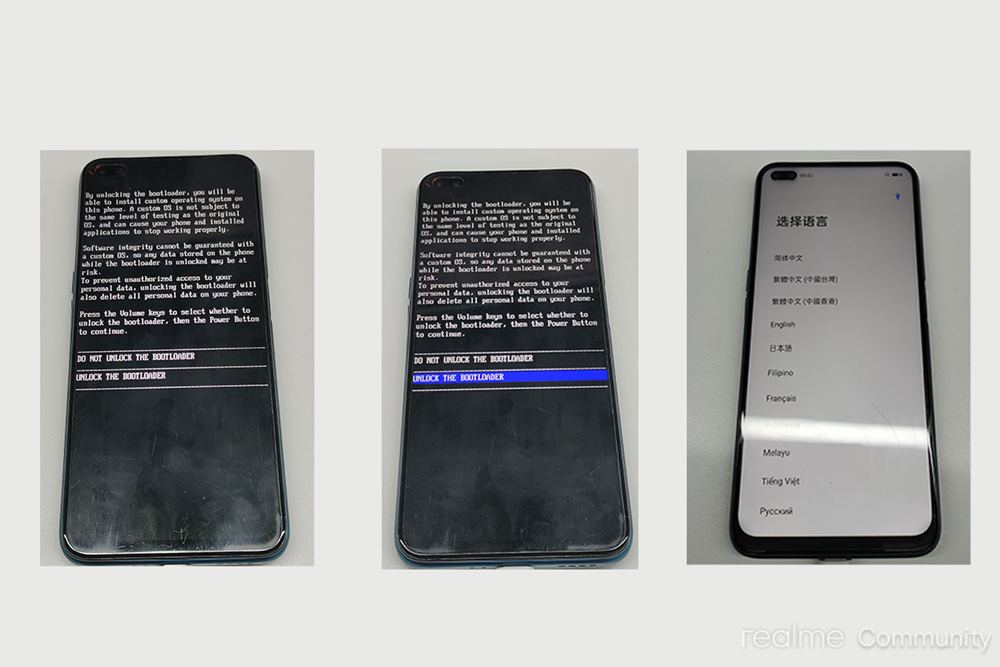
- Type: fastboot oem unlock
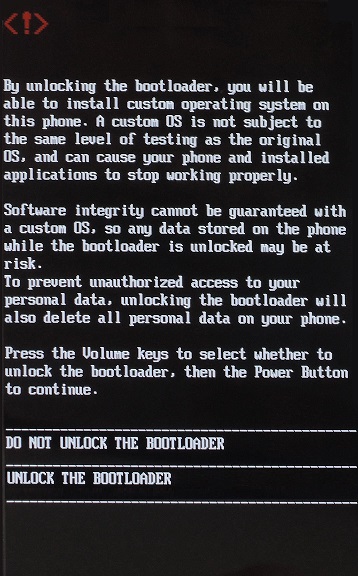
- Now choose the Unlock the Bootloader option using Volume keys and select using power key
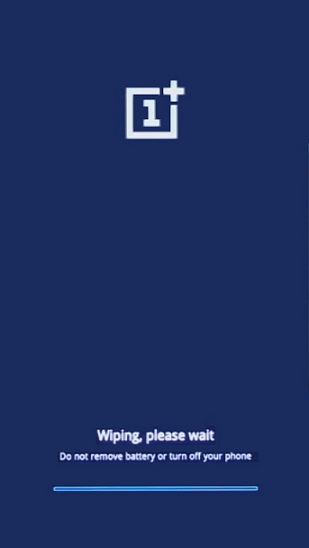
- This step will wipe out all the data and your bootloader will be unlocked successfully
For Realme Devices
- After completing the prerequisites, proceed further to next step
- For unlocking Realme device bootloader, you’ll have to download the In depth test app and install in your device, and since every device has different app, I have provided the links to app for every realme device which can be unlocked:
NOTE: I do not own any of these Apps or the apk file , nor I’m tne owner of the links provided, this app is required to unlock the bootloader provided by a third party, I’m not responsible for any harm done to your device. Proceed with caution
- Realme 3 pro (Android 10) : link
- Realme 3 pro (Android 9) : link
- Realme 5 pro (Android 10) : link
- Realme 5 pro (Android 9) : link
- Realme X pro (Android 10) : link
- Realme X pro (Android 9) : link
- Realme XT (Android 10) : link
- Realme XT (Android 9) : link
- Realme 2 pro (Android 9) : link
- Realme 1 (Android 9) : link
- Realme U1 (Android 9) : link
- Realme 3 (Android 9) : link
- Realme 3 (Android 10) : link
- Realme 5 (Android 9) : link
- Realme X2 pro (Android 10) : link
- Realme X2 pro (Android 9) : link
- Realme 5i (Android 9) : link
- Realme X2 (Android 10) : link
- Realme 6 pro (Android 10) : link
- Realme 3i (Android 10) : link
- Realme X50 pro (Android 10) : link
- Now install the app and click on Start Applying
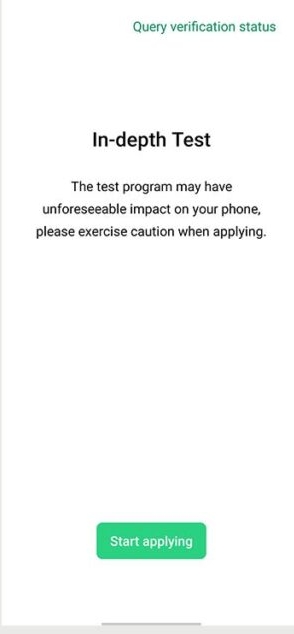
- Then accept the disclaimer and tap on submit application
- This process may take some time, so be patient
- After completion, tap on start Indepth test
- The device will reboot and you will get fastboot unlock_verify_ok message
- Now connect your phone to PC and start adb
- Type: adb devices to make sure your device has connected successfully
- Then type: adb reboot bootloader
- After the devices reboots into bootloader, type : fastboot devices and check that your device is recognised
- Then type: fastboot flashing unlock
- Use the volume keys to navigate to unlock the bootloader and press power button to confirm
- Device will enter in-depth test mode and your bootloader will be unlocked and the data will be erased subsequently
For Fairphone Devices
The following tutorial is for the Fairphone 3 and it can be used similarly for other devicesFairphone has a good policy that if you flash the original firmware from their website and relock the bootloader, you get your warranty back ☺️
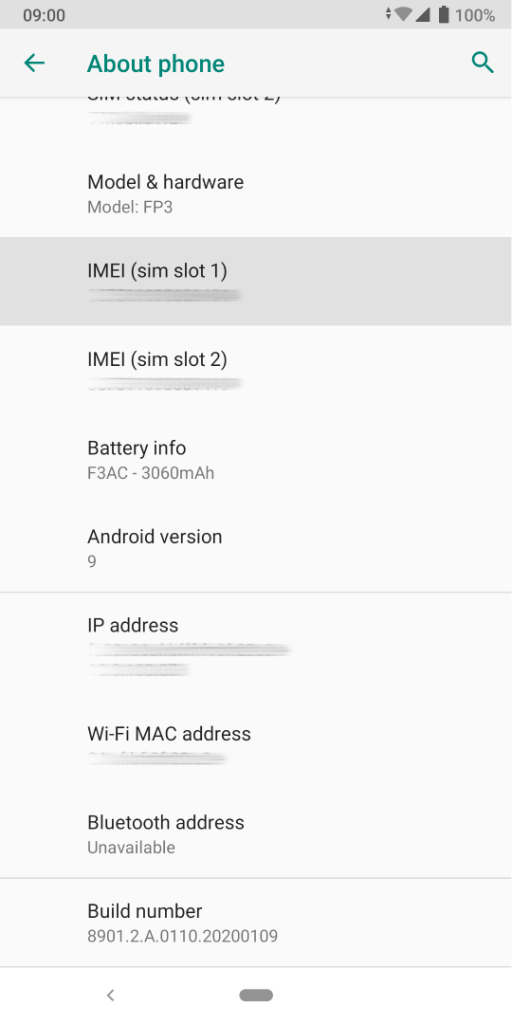
- Find the IMEI 1 for your device ( refer to the above image)
- Find the serial number of the phone at Settings → About phone → Model & Hardware → Serial number
- Note down these two numbers
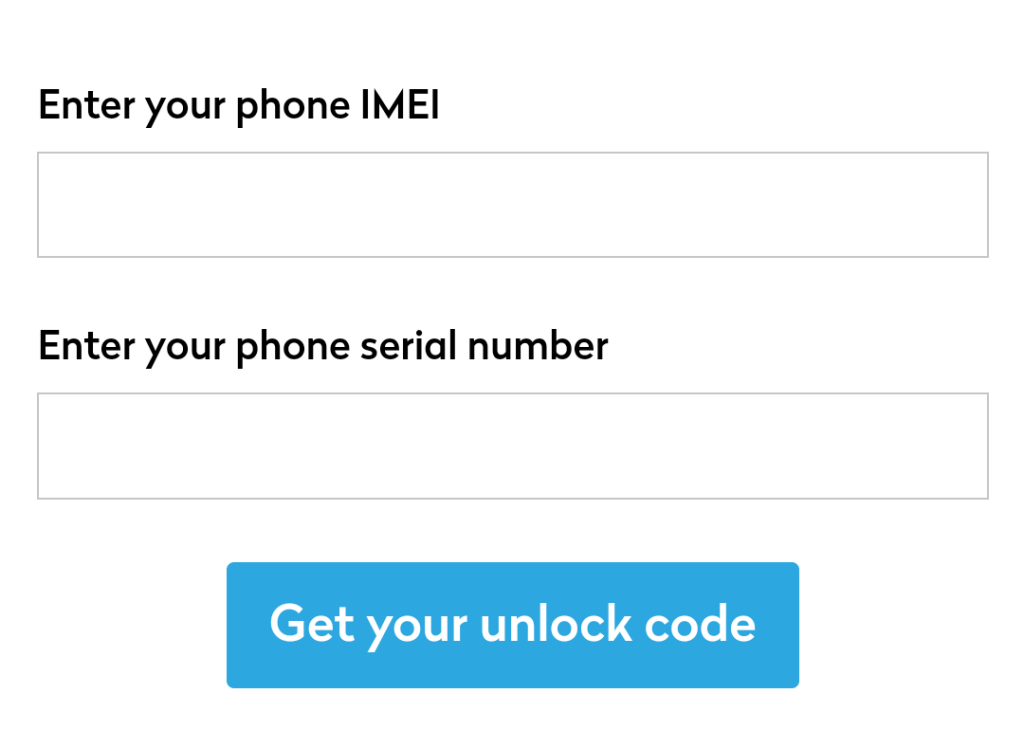
- Go to this site and enter the two numbers where the respective boxes are provided and click on : Get unlock Code
- Follow step 11 and 12 from the prerequisites section at the beginning of this page and when you come across oem unlocking, enter the required details and the code you recieved in the previous step
- Congratulations, your bootloader is now unlocked
For Samsung devices
Currently, I have divided the methods for the A series and M series seperately, that’s the only two series I know how to unlock 😅
For A series:
- After completing prerequisites, open adb and type: adb devices to confirm device detection
- Now type: adb reboot bootloader or adb reboot fastboot
- Then type : fastboot oem unlock check for any message in device
- Type: fastboot reboot
- That’s it, bootloader is unlocked
For M series:
If you just follow Step 11 and 12 from the prerequisites section, your bootloader should be unlocked, if it isn’t, then try the same method given for A series
For Google Pixel Devices

- Complete the prerequisites
- Connect the phone to PC, open adb and type: adb devices to confirm device detection
- Now type: adb reboot bootloader
- Now type: fastboot flashing unlock
- Then type: fastboot reboot
- That’s it, your bootloader is now unlocked, have fun flashing ✌️

One thought on “Unlocking The Bootloader”